Saturday, March 18, 2006

Track Laying

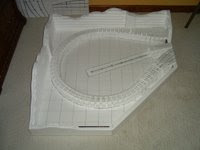
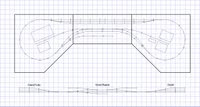
Laid the first track in the area that will eventually be a tunnel and hidden staging yard. Glued down the roadbed material and then glued the track to the roadbed. Installed a tortoise for the main yard turnout using hot glue gun. Had to mount the tortoise off to the side since I didnt want the switch machines hanging from the bottom of the module. See the photo below for details.


Tunnel Trackage


West Staging Throat


Tortoise Install

Saturday, March 04, 2006

Profile Contoring

Continued construction of west corner module. Cut contours in profile boards and added remaining riser for the paper mill spur. Beveled the risers one half inch and covered them with plaster cloth. Next step is to prepare the tunnel trackage and the hidden staging yard.


Profile Contours


Plaster Cloth

Saturday, February 25, 2006

Construction Begins

Started construction on west corner module. Added profile board and risers for the mainline trackage. Also added connector plates and cutr access holes for connector bolts. Cutting of access holes was complicated by the amount of tracks crossing the edge of the module. Had to custom fit the risers around the access holes and notch them to support small bridge sections of half inch foam scraps.


Profile Boards


Riser Installation


Access Holes

Saturday, February 11, 2006

Track Plan Layout

Next, I laid out the track plan on the base sheets. The corner modules are actually two sheets of 36"x18" material that had to be glued together first. First, I laid out a 3" squares and then transferred the track plan to the syrofoam using a black Sharpie marker. Then, I outlined where the Subterrain riser sections will be placed. The corners of the corner modules still need to be cut off. The next step is to install the profile boards around the modules.


Track Plan Layout

Sunday, January 29, 2006

Initial Track Plan

I finally managed to come up with an initial track plan. A simple water wings plan with a hidden staging yard and space for some of my Walthers Cornerstone buildings. I've got the Glacier Gravel Company pretty much complete and have the Superior Paper Company still sitting in the box. I'm not really to concerened about prototype accuracy at this point but was thinking about northern Minnesota in the early 1980's. This simple track plan could work for almost any time and era.


Initial Track Plan

Saturday, January 21, 2006

Decoder Programming

I downladed Decoder Pro from the JMRI project and played around with it for a while this weekend. I set up a circle of track and got the decoders programmed and configured. I tried out the speed tables and different lighting effects. Everything went smoothly. I also wrote some initial test code and was able to monitor LocoNet traffic through the LocoBuffer II. I was also able to turn the power on an off from my test program. I was just a simple communications test but it's a start.

Saturday, January 14, 2006

Initial Decoder Testing

In a rush to try things out, I jury rigged a piece of test track and fired up the Digitrax Zephyr DCS50. After screwing around with the buttons for a while, I finally gave up and dug out the manual. I followed the startup tutorial in the manual and was quickly up and running. It took another trip to the manual to get the lights working. I had forgotten that the lights were under function control. The speed was uncomfortably fast so I will probably need to change some settings to limit the speed. I only shot it off the end of the test track once ... :-) I also need to figure out the address settings. I would like to have them respond to their road numbers, 8301 and 8302.


Maiden Voyage Under DCC

Decoder Installation and Testing

Decoder installation on the Atlas N Scale SD-60 locomotives was quick and painless. I just removed the shells, loosened two screws, replaced the existing light boards with Digitrax DN163A1 mobile decoders, tightened the screws, and replaced the shells. I realized later that I probably should have left off the shells until the decoders were tested. I will have to crack them open again if something goes wrong. I might also need to go back later and hard wire the decoders, but for now I will just rely on the contacts.


Before Decoder Installation


After Decoder Installation

Saturday, January 07, 2006

The Locomotives

Here's a photo of my Atlas N Scale SD-60 locomotives. The Burlington Northern tiger stripe paint scheme is one of my favorites. I picked these up (used) at a train show years ago and never got a chance to use them very much. They are still in "almost new" condition, but they haven't been run in a while and will probably require some maintenance. They are DCC ready but do not have decoders installed in them yet. Hopefully I will get a chance to fire them up next weekend.


Atlas N Scale SD-60 Locomotives

Tuesday, December 27, 2005

Trip to the Hobby Shop

I made a trip to Hub Hobby Center in Richfield, MN to pick up some odds and ends of supplies. I picked up some Atlas N Code 55 Track turnouts, flex track, and rail joiners. I also grabbed some wire and a set of terminal blocks. This should make up for all the times that I left the hobby shop empty handed ... :-)


Track and Wire Supplies

Wednesday, December 21, 2005

Mod-U-Rail Contents

Here are some quick shots of the contents of one of the corner module kits. The straight module kit is similar with less parts. The first photo is the contents of the scenery material box. They pack a little bit of everything in there, folliage, turf, ballast, trees, rock castings, plaster cloth, glue, paint, etc. The long strips are the connector plates used to fasten the modules together. The second photo is the SubTerrain and Track-Bed from the rest of the kit.


Scenery Materials


SubTerrain Materials

Mod-U-Rail Shipping Damage!

Yuck! When I unpacked the first corner module, there was brown paint all over the inside of the scenery material box. Well ... not all over, just over some things near the middle of the box. Luckily, everything was wrapped in plastic and was able to be wiped clean. The culprit was a cracked bottle of earth undercoat as seen in the first photo. I taped the bottle with some packing tape and let everything dry out. The other two module kits were clean and in good shape.


Cracked Paint Bottle


Scenery Material Box

Mod-U-Rail Kits Arrive

The Woodland Scenics Mod-U-Rail kits have arrived! The contents of each module kit were pretty much the same. The straight module kit did come with some really nice Woodland Scenics catalogs, however. The brown boxes on the left side of each box are full of scenery material. The white pieces on the right side of each box are the SubTerrain risers and profile boards. The foam sheets for the base and the Track-Bed for the roadbed are underneath.


Mod-U-Rail Kits - (top to bottom) Two Corner Modules, Straight Module


Inside of a Typical Module Kit - (corner module)

Tortoise Switch Machines Arrive

The Tortoise slow motion switch machines have arrived! Mike at Charleston Digital Trains was great as usual. He offered to give me a discount next time to cover return postage but it really wasn't necessary. Stuff happens. I will definately be ordering from them again.


Tortoise Switch Machines

Friday, December 16, 2005

Tortoises and Hares

I made arrangements with Mike at Charleston Digital Trains to swap the Hare decoders for the Tortoise switch machines. Mike is a great person to work with. I sent out the Hare decoders this morning. The Tortoise switch machines should be here by December 21, 2005, about the same time the the Mod-U-Rail kits arrive.

Thursday, December 15, 2005

Digitrax Equipment Arrives

The Digitrax equipment has arrived! Unfortunately, there was a problem with the order and I got four Hare decoders (the ones that plug onto the Tortoise switch machines) instead of the four Tortoise switch machines. Looks like I will need to arrange for a Tortoise and Hare exchange ... :-)


Digitrax Equipment - (clockwise from the upper left) PS12 Power Supplies, Zephyr Starter Set, USB LocoBuffer II, BDL168 Block Occupancy Detector, DS64 Stationary Decoder, DN163A1 Mobile Decoders


Zephyr Starter Set - (clockwise from the upper left) LT1 LocoNet Test Kit, PS315 Power Supply, DCS50 Command Station/Booster/Throttle, Manuals


USB LocoBuffer II - (clockwise from the upper left) Power Supply, Installation Disk, LocoNet Cable, Manual, LocoBuffer II, USB to Serial Adapter

Tuesday, December 13, 2005

Mod-U-Rail Kits Ordered

Since I will need to get a layout together in a relatively short period of time, I sent out the order for the Woodland Scenics Mod-U-Rail system today. I ordered two of the corner modules (ST4802) and a single straight module (ST4801) from Internet Hobbies, Inc. I am trusting that they will deliver since I haven't ordered from them before. They had what I was looking for and most importantly, they accepted PayPal. The modules should be here by December 21, 2005.

Monday, December 12, 2005

Digitrax Equipment Ordered

I finally decided to order my Digitrax equipment through Charleston Digital Trains. I was impressed with their website and they had everything I was looking for at a good price. I ordered a Zephyr starter set, the USB version of the LocoBuffer II, one of the new DS64 stationary decoders, a BDL168 block occupancy detector, a couple PS12 power supplies, a pair of decoders for my N Scale Atlas SD-60 locomotives, and a set of four Tortoise switch machines. They should be here by December 15, 2005.

Sunday, December 04, 2005

You've Got Cash!

The last of the money from the Tayden Design contract was transferred into my account today. I should finally have enough to start shopping for my Digitrax equipment. I think that I will look into the Mod-U-Rail system from Woodland Scenics for the model railroad itself. I had looked into them earlier in the year but now that I have the time and money, I might as well do a little experimenting.

Tuesday, November 29, 2005

In the Beginning ...

I created this blog to track my development of an automated N scale model railroad. I recently completed a contract with Tayden Design for the initial release of their new Train Trek Layout Simulator. Our first version supports Marklin Digital equipment and the next version will have support for Digitrax. In the past, I have had to rely on Danny at Tayden Design to test the code. While this worked quite well, there were times when I wished I had a test system of my own. Therefore, I have decided to take the plunge and develop a full blown test system of my own based around Digitrax, using the LocoBuffer II as an interface.